In this Arduino servo motor tutorial, you’ll learn how to control a servo motor using an Arduino UNO board and a potentiometer.
As soon as you’ve got this example project up and running, you’ll have the skill of controlling servo motors from your Arduino. This can be the basis for more advanced robotics projects.
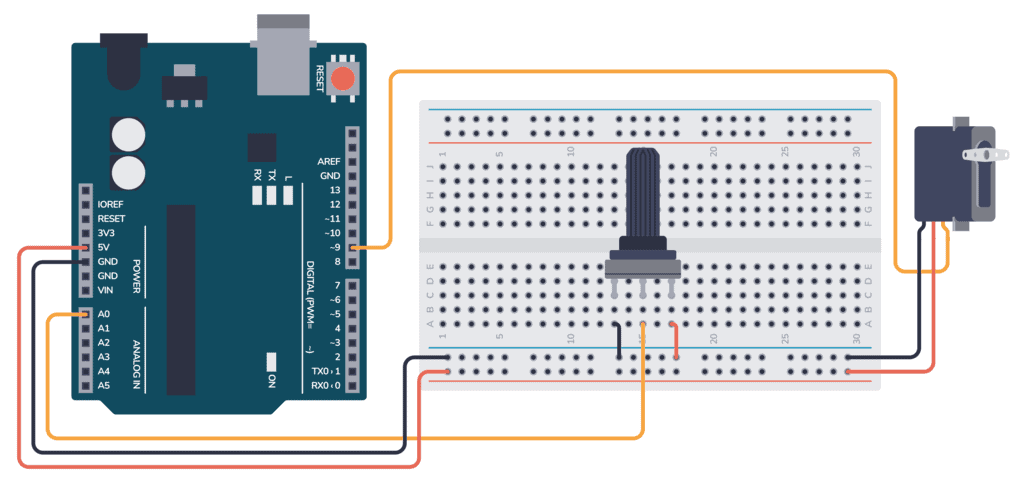
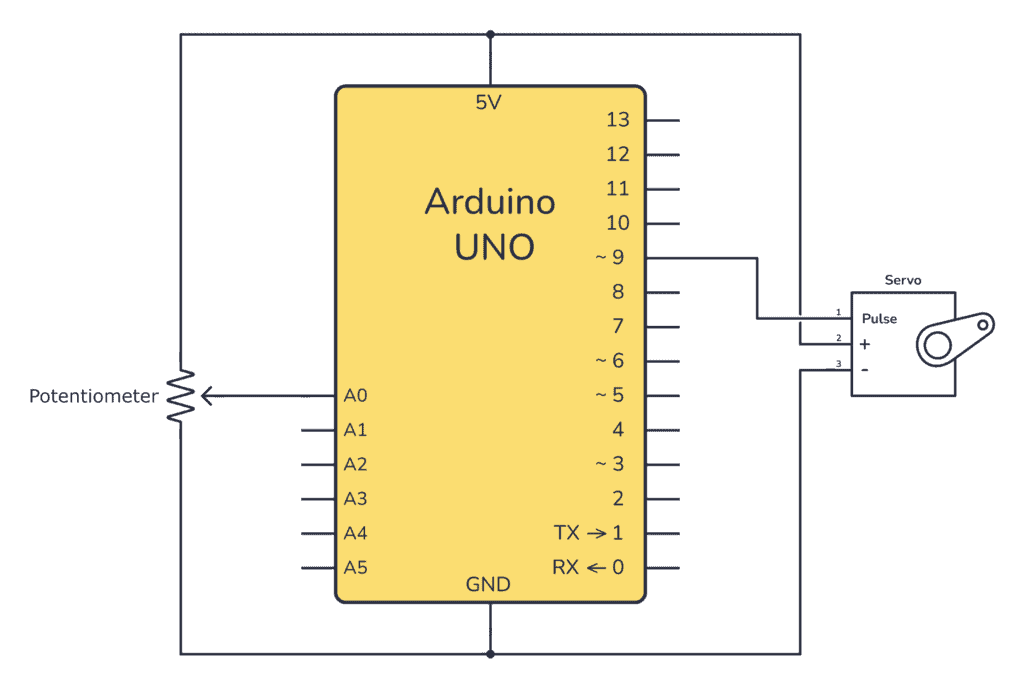
First, to test that the servo motor is working, upload the following test code. Once uploaded, the servo motor should start moving back and forth between 0 and 180 degrees. Make sure your servo is connected to pin 9 as shown in the circuit diagram.
#include // Include the Servo library Servo myservo; // Create a servo object to control the servo motor void setup() < myservo.attach(9); // Attaches the servo on pin 9 to the servo object >void loop() < // Goes from 0 degrees to 180 degrees in steps of 1 degree for (int pos = 0; pos // Goes from 180 degrees to 0 degrees for (int pos = 180; pos >= 0; pos -= 1) < myservo.write(pos); // Tell servo to go to position in variable 'pos' delay(15); // Waits for the servo to reach the position >>
This example sketch uses the potentiometer to control the position of the servo motor. When you turn the potentiometer, the servo motor should move correspondingly to the position dictated by the potentiometer’s resistance.
This code is based on the basic Arduino Potentiometer example.
#include Servo myservo; // Servo object to control the motor int potpin = A0; // Where the potentiometer is connected int val; // Variable to read the potentiometer value void setup() < // Tell the servo object which pin to use myservo.attach(9); >void loop() < // Read the value of the potentiometer (value between 0 and 1023) val = analogRead(potpin); // Scale it to use it with the servo (value between 0 and 180) val = map(val, 0, 1023, 0, 180); // Set the servo position according to the scaled value myservo.write(val); // Wait for the servo to reach the position delay(15); >Once the code is uploaded, turning the potentiometer will change the resistance and the analog value read by the Arduino, which in turn will control the position of the servo motor.
You can now experiment with the positions and understand how the servo motor responds to the potentiometer’s adjustments.
If the servo motor isn’t responding:
Learn the basics that every Arduino maker should know, and it'll open you up to a world of possibilities! Sign up for my circuit tips by email and I'll send you the eBook:
Remember, practice makes perfect. Don’t hesitate to tweak the code and circuit to learn more about how they interact.
If you have any questions, let me know in the comments below!
Learn the basics that every Arduino maker should know, and it'll open you up to a world of possibilities! Sign up for my circuit tips by email and I'll send you the eBook: